HOW TO POSE FOR YOUR WEDDING PHOTOS
There are some tricks that you can adopt to look better in your wedding pictures irregardless of whether it's a professional photographer who poses you or your uncle or auntie whose instructions is limited to "say cheese!".
If you're being told that you could look 5kgs thinner simply by doing a certain body posture or standing in a certain way, wouldn't you want to try it?
By knowing these tips and secrets, and spending some time in front of the mirror practicing before the big day, you can help look your best on your wedding day.
Ok ladies, let's get down to it :
POINT YOUR TOES
You may think a pointed toe doesn't matter because most wedding gowns cover your feet - think again, cos it does make a difference.
Avoid planting both your feet together while flat on the ground. Move a foot to point your toes - by doing this, you are shifting your weight to your back foot, which will cause your hip to shift. This hip-shift makes you look more curvy.
Now, a little goes a long way. You want to look sexy but with an innocent overtone.
Generally speaking, your entire body should never be square with the camera but slightly side-on - it should always be at some angle, usually 45-degree or more.
RELAX YOUR SHOULDERS
People tend to tighten and raise their shoulders when they are nervous and this causes a couple of problems. It makes your shoulder appear narrower than they really are, your neck seems shorter, and worse, it creates a feeling and look of tenseness.
To be able to do this pose, you have to concentrate on relaxing your shoulders - let them fall naturally.
GET YOUR ELBOWS AWAY FROM YOUR BODY
Unless you are super-slim, pose with your elbows slightly away from your sides.
If you pose with your elbows touching the sides of your body, your body will look as wide as the elbow-to-elbow dimension, not to mention that if you have less than ideal tone upper arms, it will get squished and look even bigger.
Just move your elbows slightly away from your sides, creating just a small separation between your body and your arm, people will notice the cut-in of your waistline in your photos and this makes your torso appears slimmer.
Learn this pose with care. When you are moving your elbows outward, make sure that you do not lift your shoulders (which we already know, is not a good thing). Also you only want to move your elbows slightly away from your sides - too far out and you'll look like you're doing the funky chicken dance !
MAKE YOUR EYES APPEAR BIGGER
It is usually less flattering to tilt your head back because your chin becomes more prominent than your eyes. So lower your chin by a fraction of an inch - this will effectively bring your eyes closer to the camera than your chin and mouth and makes your eyes appear bigger.
Remember, just a tiny dose of this trick will do - too much lowering and you might cause a double chin - so use it sparingly and practice in front of the mirror.
RELAX YOUR FOREHEAD
Often, in trying to accentuate their eyes, brides will try to open their eyes as widely as possible.
In the process of trying to do this, they raise their eyebrows which creates a "surprise look" and a wrinkled forehead.
So keep your eyes and forehead relaxed in order to look more natural - practice your facial poses in front of the mirror till you are familiar with the movements.
BRIDES WITH SPECTACLES
Brides wearing spectacles - I've not forgotten about you !
HOLDING YOUR BOUQUETS
"How should I hold my bouquet?" - two words for you - "LOWER IT !"
Many times, brides look as if they're hiding behind their flowers. The bodice of your wedding gown is beautiful, so why hide it behind your flowers? Holding your bouquet too high will also hide your bustline and it also places your forearm in a horizontal position, creating a line that cuts your body in half.
By holding your bouquet lower, you can cover your little potbelly or broad hip - it also places your forearm at a 45-degree angle which makes your body look longer and leaner.
Not sure how low to hold your bouquet? - here's a little trick - rest your wrists on your hipbones and usually, you've hit the perfect height.
NOTE :
All the suggestions, tips and tricks about posing should be used sparingly. Overdoing a good thing can result in negative results. Your application of these poses should be measured in fractions of an inch.
No tricks is going to magically transform you into a super-model. But by using all of them - each one improving your image a little bit - the end result will add up to a noticeable change for the better in your photos.
If you're being told that you could look 5kgs thinner simply by doing a certain body posture or standing in a certain way, wouldn't you want to try it?
By knowing these tips and secrets, and spending some time in front of the mirror practicing before the big day, you can help look your best on your wedding day.
Ok ladies, let's get down to it :
POINT YOUR TOES
You may think a pointed toe doesn't matter because most wedding gowns cover your feet - think again, cos it does make a difference.
Avoid planting both your feet together while flat on the ground. Move a foot to point your toes - by doing this, you are shifting your weight to your back foot, which will cause your hip to shift. This hip-shift makes you look more curvy.
Now, a little goes a long way. You want to look sexy but with an innocent overtone.
Avoid placing both feet together (left)
A pointed toe gives more shape to your hip (right)
TURN YOUR SHOULDER AT A 45-DEGREE ANGLE TO THE CAMERA
If you turn your body slightly to the right or left, you will appear slimmer in the photo.Generally speaking, your entire body should never be square with the camera but slightly side-on - it should always be at some angle, usually 45-degree or more.
You will look slimmer when you turn at a 45-degree angle.
RELAX YOUR SHOULDERS
People tend to tighten and raise their shoulders when they are nervous and this causes a couple of problems. It makes your shoulder appear narrower than they really are, your neck seems shorter, and worse, it creates a feeling and look of tenseness.
To be able to do this pose, you have to concentrate on relaxing your shoulders - let them fall naturally.
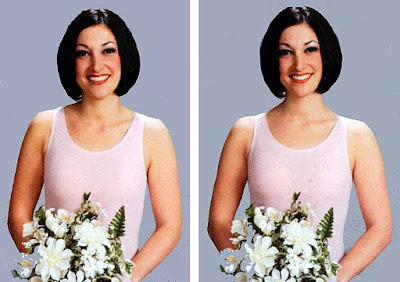
Hunching your shoulders makes your neck appear shorter (left)
Relaxing your shoulders instantly makes you look more natural and less tense (right)
Relaxing your shoulders instantly makes you look more natural and less tense (right)
GET YOUR ELBOWS AWAY FROM YOUR BODY
Unless you are super-slim, pose with your elbows slightly away from your sides.
If you pose with your elbows touching the sides of your body, your body will look as wide as the elbow-to-elbow dimension, not to mention that if you have less than ideal tone upper arms, it will get squished and look even bigger.
Just move your elbows slightly away from your sides, creating just a small separation between your body and your arm, people will notice the cut-in of your waistline in your photos and this makes your torso appears slimmer.
Learn this pose with care. When you are moving your elbows outward, make sure that you do not lift your shoulders (which we already know, is not a good thing). Also you only want to move your elbows slightly away from your sides - too far out and you'll look like you're doing the funky chicken dance !
Your body and arms appear bigger when you hold your arms in (left)
With your elbows away, you accentuate your waistline (right)
With your elbows away, you accentuate your waistline (right)
MAKE YOUR EYES APPEAR BIGGER
It is usually less flattering to tilt your head back because your chin becomes more prominent than your eyes. So lower your chin by a fraction of an inch - this will effectively bring your eyes closer to the camera than your chin and mouth and makes your eyes appear bigger.
Remember, just a tiny dose of this trick will do - too much lowering and you might cause a double chin - so use it sparingly and practice in front of the mirror.
RELAX YOUR FOREHEAD
Often, in trying to accentuate their eyes, brides will try to open their eyes as widely as possible.
In the process of trying to do this, they raise their eyebrows which creates a "surprise look" and a wrinkled forehead.
So keep your eyes and forehead relaxed in order to look more natural - practice your facial poses in front of the mirror till you are familiar with the movements.
BRIDES WITH SPECTACLES
Brides wearing spectacles - I've not forgotten about you !
- Transition lenses are a big NO - NO! They darken when outdoors and even when you're indoor, they appear dark in photos.
- Have non-glare lenses as they help to reduce reflections.
- The lenses should not tilt upward because this will amplify the reflections from the camera's flash. Tilt the lenses slightly downward so that the flash will be reflected harmlessly towards the ground. This trick can be accomplished by lowering your chin slightly.
Notice how the glare hides your eyes (left)
A slight nod downwards will help cut glare (right)
A slight nod downwards will help cut glare (right)
HOLDING YOUR BOUQUETS
"How should I hold my bouquet?" - two words for you - "LOWER IT !"
Many times, brides look as if they're hiding behind their flowers. The bodice of your wedding gown is beautiful, so why hide it behind your flowers? Holding your bouquet too high will also hide your bustline and it also places your forearm in a horizontal position, creating a line that cuts your body in half.
By holding your bouquet lower, you can cover your little potbelly or broad hip - it also places your forearm at a 45-degree angle which makes your body look longer and leaner.
Not sure how low to hold your bouquet? - here's a little trick - rest your wrists on your hipbones and usually, you've hit the perfect height.
Hold your bouquet a little lower, with your wrists on your hipbones and don't forget your 45-degree angle turn to look slimmer !


NOTE :
All the suggestions, tips and tricks about posing should be used sparingly. Overdoing a good thing can result in negative results. Your application of these poses should be measured in fractions of an inch.
No tricks is going to magically transform you into a super-model. But by using all of them - each one improving your image a little bit - the end result will add up to a noticeable change for the better in your photos.


0 comments:
Post a Comment